 Home
HomeSwitch to Auto-Login
3 posters
:: Forum :: Help and support
Page 1 of 1

Switch to Auto-Login
![]() by PastorBirt Fri Dec 11, 2015 9:44 am
by PastorBirt Fri Dec 11, 2015 9:44 am
I installed ChaletOS today. I meant to set it up for auto-login and failed to do so. How can I switch to auto-login so that it bypasses the Login Screen? I've gone into Users Settings and changed the password option to "Not asked on login". While it does not require the password to login, it still goes to the login screen rather than going directly to the desktop.
A word of explanation: I am a teacher. This is not my primary computer that I use on a day to day basis. This is an old PC that keep around for some of my students to use. So when I give it to a student, I don't want it to stop at the login screen. There will be no important or sensitive information on this laptop.
A word of explanation: I am a teacher. This is not my primary computer that I use on a day to day basis. This is an old PC that keep around for some of my students to use. So when I give it to a student, I don't want it to stop at the login screen. There will be no important or sensitive information on this laptop.

PastorBirt- Posts : 3
Join date : 2015-12-11
Location : USA
Re: Switch to Auto-Login
![]() by Dits Fri Dec 11, 2015 10:23 am
by Dits Fri Dec 11, 2015 10:23 am
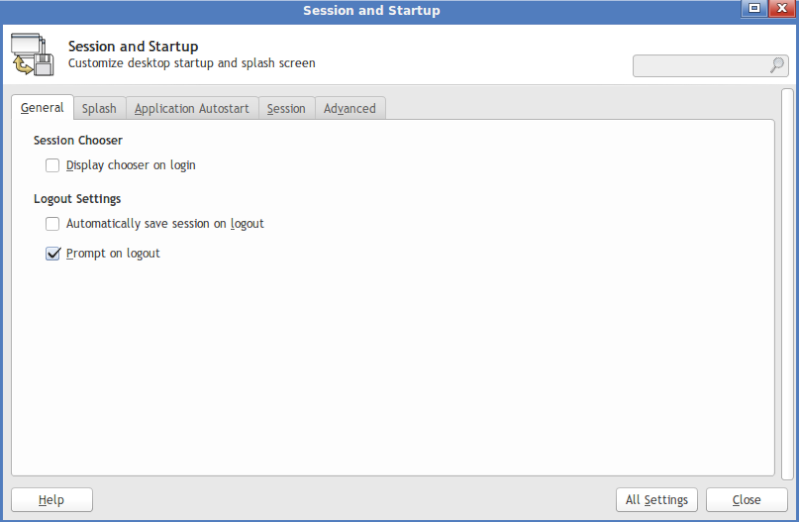
Hi PastorBirt... have you tried the Session and Start up option? It's in Settings Manager / Session and Startup.
Un-tick the box 'Display chooser on log in' pictured below
Hope it helps.
Un-tick the box 'Display chooser on log in' pictured below
Hope it helps.

Dits- Posts : 157
Join date : 2015-04-30
Location : South Australia -

Re: Switch to Auto-Login
![]() by PastorBirt Sun Dec 13, 2015 1:23 am
by PastorBirt Sun Dec 13, 2015 1:23 am
Thanks for the assist. I already had the option to display the chooser on login un-ticked. It still shows the login screen in the boot sequence.
PastorBirt- Posts : 3
Join date : 2015-12-11
Location : USA
Re: Switch to Auto-Login
![]() by BroDan Sun Dec 13, 2015 4:02 am
by BroDan Sun Dec 13, 2015 4:02 am
This is the only way that I know how to do what you're wanting...see if this works for you.
1. Open the Terminal, and enter (or copy and paste) the following command...
sudo mousepad /etc/lightdm/lightdm.conf
2. Enter your password.
That will open the LightDM configuration file which controls the log in screen.
3. Now scroll down the configuration file until you find the following line close to the bottom (roughly 3/4 of the way down the file)...
#autologin-user=
4. Place your cursor to the immediate right of the hashtag (#) and hit Backspace on your keyboard to remove the hashtag.
5. Immediately after the equals sign, enter the name of the user (use all lowercase letters).
So now, after your changes, that line will look like this...I'll use Bob as the user...
autologin-user=bob
The hashtag is removed, and the user's name is filled in after the equals sign.
One other thing while you have the configuration file open. Scroll up a few lines of the file from where you just made the changes and find this line...
#greeter-hide-users=false
IF...I repeat...IF there is no hashtag to the left of that line, put your cursor to the left of the line, and put a hashtag next to it.
6. Close the configuration file, and agree to save the changes.
7. Close the Terminal.
8. Restart the computer, and it should log directly in to the user's desktop.
Hope that helps.
Edited to add this screenshot...see the 2 areas in red boxes? Those are the 2 lines that I was referring to in the post...

BroDan- Posts : 86
Join date : 2015-05-07
Re: Switch to Auto-Login
![]() by PastorBirt Sat Dec 19, 2015 2:23 am
by PastorBirt Sat Dec 19, 2015 2:23 am
Thanks for the assistance. When I tried to open the file as you specified, first of all there were numerous lines of errors that scrolled on the screen in terminal. The file did finally open, except the file was empty. I tried simply opening mousepad with sudo and then opening lightdm.conf. Again, the file was empty. In the file browser it showed the file had 0 kbytes. So I decided to just go ahead and enter the line you suggested anyway. After saving and telling my laptop to restart, it would no longer boot. It went to the Chalet OS splash screen and hung there. I hadn't really done a lot of work on the system yet anyway, and this is an old computer that I keep around to let students use, so I simply reinstalled Chalet OS and this time selected the correct options for auto login and all is now well in the world... or at least on that laptop. Thanks again for your assistance.
PastorBirt- Posts : 3
Join date : 2015-12-11
Location : USA
Re: Switch to Auto-Login
![]() by BroDan Sun Dec 20, 2015 6:15 am
by BroDan Sun Dec 20, 2015 6:15 am
I'm sorry you had trouble...don't know why it would have acted the way you described after entering the command. That's really strange.
Still, I'm glad you got it fixed...even though you had to reinstall.
Still, I'm glad you got it fixed...even though you had to reinstall.
BroDan- Posts : 86
Join date : 2015-05-07
:: Forum :: Help and support
Page 1 of 1
Permissions in this forum:
You cannot reply to topics in this forum|
|
|